
Ever dreamed of transforming your kitchen into a beautiful, functional space without paying thousands for labor? Learning how to install kitchen cabinets might be easier than you think!
Most homeowners hesitate to take on cabinet installation because it seems complicated. Taking perfect measurements, leveling, and drilling, it sounds like a professional’s job.
However, hiring a contractor can cost you a lot, and even then, you cannot expect to achieve the exact finish or alignment you wanted for your kitchen cabinets. That’s why homeowners often hesitate to install kitchen cabinets themselves.
But with the right tools, planning, and clear guidance, you can easily install your own kitchen cabinets like a pro. This step-by-step DIY guide will show you exactly how to install kitchen cabinets with expert efficiency.
Step-by-Step Guide: How to Install Kitchen Cabinets
Installing kitchen cabinets may look difficult at first sight, but once you understand the process, it becomes very easy. Let’s walk through each step in detail so you can confidently install the kitchen cabinets.
Step 1: Plan and Measure
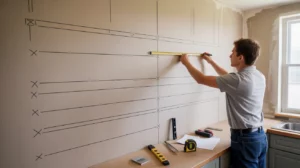
Proper planning and precise measurement are the foundation of a perfect cabinet installation. Take your time mapping out where each cabinet will go and ensure your walls and floors are ready for the installation. This step of careful planning and measurement eliminates mistakes later and also helps you visualize how your new kitchen layout will look.
- Measure your walls, then mark where each cabinet will go.
- Locate studs with the help of a stud finder to identify strong anchor points.
- Mark a level line for the base cabinets and another for the wall cabinets (typically 18 inches apart).
For a perfect installation, double-check measurements before drilling, as minor errors can lead to big headaches later.
Step 2: Remove Old Cabinets

If you are replacing existing cabinets, you’ll first need to remove them to protect your walls and flooring carefully. This step might seem negligible, but it actually sets the stage for a smooth installation of your new cabinet units. Take your time and use the proper tools to avoid unnecessary damage.
- Turn off the water and power lines in the area.
- Unscrew and gently detach old cabinets.
- Cut through caulk lines with a utility knife.
- Smooth out the wall surface before installing new units.
Also, whenever you replace your existing kitchen cabinets, make sure to label plumbing and electrical points before removing any fixtures. It’ll make reinstallation easier.
Step 3: Install the Upper (Wall) Cabinets First
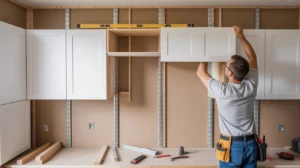
When it comes to installing, we always start from the base. When you start from the base, you will need to make the adjustments again later once the upper cabinets are installed.
But starting with the upper cabinets makes the process easier, since you won’t have to work over the base cabinets again. This step requires precision and support, so take enough time and double-check each cabinet’s position and alignment as you go.
- Mark your reference lines by identifying where the bottom of each wall cabinet will sit.
- Add a temporary ledger board to support the cabinets during installation.
- Mount the first cabinet in a corner.
- Check for level and plumb, and adjust using shims if necessary.
- Install adjoining cabinets using a clamp, drill pilot holes, and secure with screws.
While installing the cabinets, keep rechecking the levels, as slight shifts can affect their alignment.
Step 4: Install the Base Cabinets
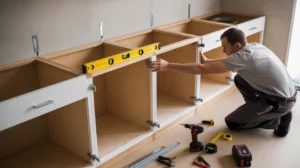
Now that the wall cabinets are securely in place, it’s time to focus on the base units. These cabinets support your countertop, so leveling and stability are crucial. So, pay attention to details here to avoid gaps and uneven surfaces.
- Start from the highest floor point to ensure an even top line.
- Position the first cabinet by leveling it using shims.
- Clamp and screw the remaining cabinet units together side by side.
- Check alignment frequently to ensure tops and fronts are correctly aligned.
To avoid scratches and alignment issues, it is recommended not to install doors and drawers until all cabinets are installed correctly.
Step 5: Secure the Countertop
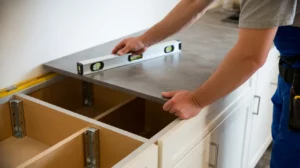
Your countertop is the final step for cabinet installation. Also, installing a countertop affects the overall look of your cabinets and kitchen. That’s why you should make sure it’s perfectly level and properly supported. For heavy materials like stone or quartz, get help from other people for lifting and setting.
- Position the countertop.
- Check for level.
- Secure it using screws through the corner braces inside the cabinets.
If the countertops are made of laminate or wood, do not overtighten the screws, as this can cause cracks or damage.
Step 6: Finishing Touches

Once your kitchen cabinets and countertop are installed, it’s time to give a final touch-up to enhance the overall look. Small finishing touches make a big difference in the final appearance of your kitchen. Take this opportunity to align everything and add details that enhance the look of your kitchen and cabinets.
- Reattach doors, drawers, and handles.
- Fill gaps or screw holes with wood filler.
- Apply caulk where needed.
- Clean and polish all surfaces.
After giving final touches, step back and inspect from multiple angles. Even minor adjustments will make your DIY cabinet installation look professional.
Final Say
From this guide, you now clearly understand how to install kitchen cabinets from start to finish. With fine attention to detail, you can completely transform your kitchen and save thousands in labor costs.
Looking for stylish cabinets that give your kitchen an elegant look? FastTrack Cabinets becomes your perfect partner. With a versatile collection and stylish designs, our kitchen cabinets are your one-stop solution for a modern, sleek look without breaking the bank.
Explore our kitchen cabinets to have a stylish kitchen look affordably.